Parking Sistem

How to proceed with subscription after trial ends

When the free trial period of Restro ends, you will need to purchase a subscription plan to continue using the platform’s features without interruptions. The subscription process is simple and ensures your restaurant operations run smoothly without downtime.

Upgrade your subscription with Restro

Steps to Purchase a Subscription

  1. Login to Restro Dashboard with your Admin credentials.
  2. You can check the subscription days left on the upper bar of the platform. Click on the trial expired button near to the profile
  1. Explore different subscription packages (e.g., Basic, Standard, Premium) and also based on monthly or annual subscription and choose what fits best for your business. 
  2. Change the pricing as per your currency. 
  3. Compare features such as the number of branches, staff accounts, reporting options, and support levels.
  4. Click on “Choose Plan” under the package you want.
  5. Restro supports multiple gateways such as Razorpay, Stripe, QR Payment, and Offline Payment. Choose your preferred payment option.
  6. Review your plan details and click “Confirm Payment.” Complete the transaction using your chosen method.
  7. Once the payment is successful, your subscription will be active immediately. You will receive a confirmation email and invoice.

Free Trial vs Paid Subscription

Free Trial

  • Limited duration (e.g., 30 days).
  • Access to only basic features like order placement and billing.
  • Often restricted to single branch usage.
  • No access to advanced reports, multi-branch management, or delivery integrations.
  • Limited customer support (community/forum only).

Paid Subscription

  • Unlimited access to modules  based on plans (Reservations, Orders, KOT, Billing, Payments, Staff Management, Reports, and more).
  • Manage multiple branches from one dashboard.
  • Access to advanced reports (sales, category, item-wise insights, direct print logs).
  • Full delivery integrations with executives and partners.
  • Customizable settings for branding, themes, receipts, roles, and notifications.
  • Priority customer support & training assistance.
  • Regular updates and security enhancements included.

With this, restaurants can smoothly transition from the trial period to a full subscription without losing access to their system or data.

In case you face any issues while adding the subscription or have any queries, feel free to reach out to hello@sistem.app
Our team will respond to your queries as soon as possible.

Have an amazing growth with Restro Sistem

Muskan Saini
Muskan Saini


Parking Sistem

Settings Hub in Restro Platform

The Settings Panel in Restro provides complete control over how a restaurant’s digital operations are configured. It allows administrators to define business details, financial standards, staff roles, payment methods, and customer-facing features ensuring the system works smoothly for both the restaurant team and customers.

Each section in the Settings Panel has a specific purpose, helping restaurant owners customize the platform to match their brand identity, operational workflows, and customer needs.

Restaurant Settings

The Restaurant Settings section manages the core information about the restaurant.

  • Configure restaurant name, phone number, email, and physical address.
  • A Tax Settings checkbox allows you to display the Tax ID on customer orders.

App Settings

The App Settings control country, timezone, and currency.

  • Aligns the system with the restaurant’s location and local financial standards.
  • Ensures consistency in billing, payments, and scheduling.

Branch Settings

For restaurants with multiple locations, the Branch Settings allow efficient management.

  • Add a new branch by entering branch name and address.
  • Existing branches are listed in a table for quick reference.
  • Admins can modify or delete branches as needed.

Currency Settings

The Currencies Section helps businesses manage international transactions.

  • Includes an Add Currency button to introduce new currency types.
  • Supports restaurants that cater to tourists or operate in multiple countries.

Email Settings

The Email Settings automate communication between the restaurant, customers, and staff.

  • Enable or disable notifications for
    • New orders (alert admin)
    • Reservation confirmations (sent to customers)
    • New reservations (alert admin)
    • Order bills (sent to customers)
    • Welcome emails (sent to new staff)

Tax Settings

The Taxes Section allows restaurants to manage applicable taxes.

  • Add, update, or delete tax entries such as CGST, SGST, or Service Charges.
  • Each tax includes a percentage rate.
  • Taxes are automatically applied to orders for accurate billing.

Payment Settings

The Payment Gateway Settings let admins configure payment options.

  • Supported gateways: Razorpay, Stripe, Offline Payments, QR Code Payments.
  • Owners can enable or disable gateways based on customer preference.

Theme Settings

The Theme Settings control the restaurant’s branding inside the system.

  • Upload the restaurant logo.
  • Choose to display or hide the restaurant name alongside the logo.

Staff Role Settings

The Staff Roles feature manages permissions for different team members.

  • Define roles such as Branch Head, Waiter, or Chef.
  • Use “+” to grant permissions (create, view, update, delete).
  • Use “-” to revoke permissions.

Reservation Settings

The Reservation Settings allow structured table booking.

  • Define slot types (Breakfast, Lunch, Dinner).
  • Set start and end times.
  • Configure time slot differences (intervals between reservations).
  • Enable or disable slots as needed.

About Us Settings

The About Us Section helps restaurants personalize their online presence.

  • Add a business description with a text editor.
  • Use bold, italics, lists, or links to create engaging content.
  • Configure >> Branch Settings Guide

Customer Site Settings

The Customer Site Settings control the features visible to customers online.

  • Enable/disable dine-in, pickup, delivery, and online ordering.
  • Configure dine-in features such as waiter requests and table selection.
  • Set default reservation status.
  • Add social media links (Facebook, Instagram, Twitter).

Receipt Settings

The Receipt Settings allow customization of printed or emailed receipts.

  • Show/hide customer details (name, address).
  • Display order details (table number, waiter, guest count).
  • Include restaurant logo and tax information.
  • Use Preview Receipt before finalizing changes.

Billing Settings

The Billing Settings section configures how orders are billed and invoices are generated.

  • Define invoice number formats and prefixes.
  • Choose whether to auto-generate bills after an order is completed.
  • Enable/disable split billing to allow customers to divide payments among multiple payers.
  • Set round-off rules to manage decimal billing values.

Printer Settings

The Printer Settings section manages printing configurations for receipts and KOT (Kitchen Order Tickets).

  • Add and configure multiple printers for billing and kitchen.
  • Assign specific printers to branches or counters.
  • Monitor direct print logs to track successful and failed prints.
  • Helps quickly resolve printing issues by highlighting errors.

Delivery Settings

The Delivery Settings allow restaurants to configure delivery options.

  • Define delivery zones, minimum order amounts, and delivery charges.
  • Set estimated delivery times for customer orders.
  • Enable or disable third-party delivery integrations if supported.
  • Configure delivery availability for specific branches.

KOT Settings

The KOT (Kitchen Order Ticket) Settings manage how orders are routed to the kitchen.

  • Configure auto-printing of KOTs once an order is placed.
  • Assign different printers to sections (e.g., bar, grill, desserts).
  • Customize KOT formats with order details like table number, waiter, and item notes.
  • Allow re-printing of KOTs in case of errors or changes.

Cancellation Settings

The Cancellation Settings define rules for canceling orders or reservations.

  • Allow or restrict order cancellations by customers after placement.
  • Configure whether cancellations require manager approval.
  • Set policies for refund eligibility when prepaid orders are canceled.
  • Track cancellation logs for audit and reporting purposes.

Why Settings Are Important

The Settings Panel is the backbone of Restro’s customization. By configuring settings properly, restaurant owners ensure:

  • Accuracy in billing and taxation.
  • Efficiency in kitchen and delivery workflows.
  • Flexibility in customer preferences (payment, reservations, delivery).
  • Accountability through proper role-based access and cancellation rules.
  • Professional branding across receipts, emails, and customer-facing platforms.

With the right settings in place, restaurants can deliver a seamless, professional, and customer-friendly dining experience.

Muskan Saini
Muskan Saini


Parking Sistem

Reports and Analytics in Restro Platform

The Reports Section in Restro provides restaurants with a centralized interface to monitor sales performance, item popularity, category contributions, and printing efficiency. By analyzing these reports, managers and owners can make data-driven decisions to improve menu planning, promotions, inventory management, and overall operations.

The interface includes date filters, category filters, and export options, allowing businesses to refine data and download reports for offline use, audits, or deeper analysis.

Sales Report

The Sales Report gives a clear overview of the restaurant’s daily financial performance.

  • Shows total sales within a selected date range.
  • Breaks down the number of items sold and revenue earned per day.
  • Helps managers track sales growth, identify peak business days, and measure staff performance.
  • You can filter the reports and export based on the date and time ranges. For more advanced features, it can list out the payments done by specific staff member. 

Item Report

The Item Report focuses on performance at the dish level.

  • Displays sales data for each item, including quantity sold and revenue generated.
  • Identifies top-performing dishes that drive revenue.
  • Highlights underperforming items, helping in menu optimization (re-pricing, promotions, or removal).
  • Assists with inventory planning, ensuring stock aligns with demand.
  • Item reports can be exported and filtered out based on item popularity and category in demand

Category Report

The Category Report groups sales into broader menu categories, such as Starters, Main Course, Drinks, Desserts, or Breads.

  • Shows the quantity sold and revenue earned for each category.
  • Helps analyze which categories contribute most to the restaurant’s overall sales.
  • Useful for category-level promotions, customer preference analysis, and seasonal menu planning.

Direct Print Logs

The Direct Print Logs provide transparency into printing activities across the restaurant.

  • Tracks the number of successful prints for bills, invoices, or kitchen order tickets.
  • Displays failed print attempts, helping staff identify and resolve printer issues quickly.
  • Ensures reliable printing for smooth order and billing operations.

Integration with Other Modules

The Reports Section works hand-in-hand with other modules of Restro:

  • Payments Module → All completed payments, including Cash, Card, UPI, or Due, feed directly into reports. This ensures accurate daily sales tracking and financial reconciliation.
  • POS Module → Every order placed through POS contributes to sales, item, and category reports, giving a real-time picture of restaurant performance.
  • Orders Module → Each order (dine-in, delivery, or pickup) updates sales data, ensuring reports reflect actual operations without manual effort.
  • Reservations Module → Helps compare reserved tables vs. walk-ins, providing insights into customer behavior and how reservations impact sales trends.

With these integrations, the Reports Section provides a complete 360° view of restaurant performance. Managers can not only see how much revenue is generated but also understand where it comes from whether from a specific item, a popular category, or a reservation-driven order.

Check out How payments can affect the reports

Muskan Saini
Muskan Saini


Parking Sistem

Payment Management and how it affects other reports

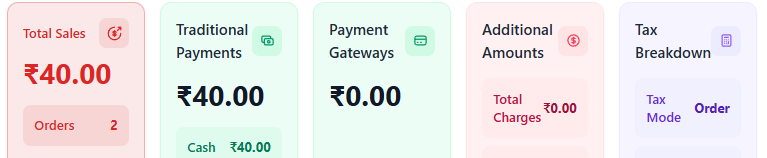
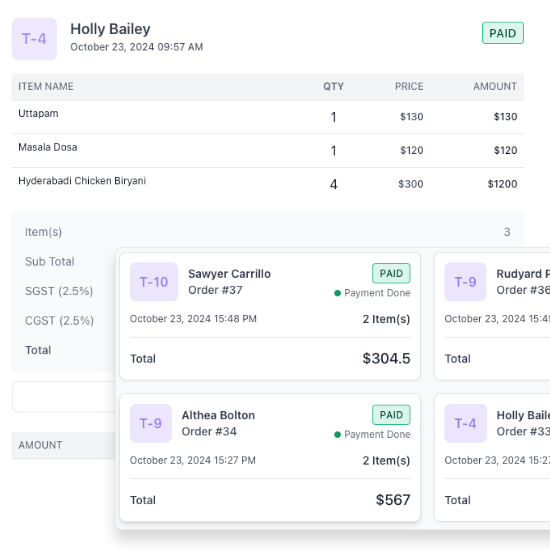
The Payments Module in Restro Platform provides a clear and structured way to record, track, and analyze financial transactions linked with customer orders. By integrating directly with the POS and Orders modules, this feature ensures transparency, accuracy, and efficiency in handling payments.

Why Payment Management is Important

  • Financial Accuracy – Keeps a record of every transaction made.
  • Transparency – Staff and management can review payment history anytime.
  • Flexibility – Supports multiple payment methods and partial payments.
  • Business Insights – Integrated reports highlight sales performance, item popularity, and customer preferences.

Payment Records Interface

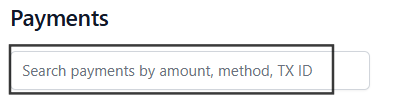
The Payments page displays all transactions in a searchable and organized table.

  • Search & Filter Options – Quickly find payments by amount, method, or transaction ID.
  • Table Details – Each row shows Payment ID, Amount, Payment Method (Cash, Card, UPI, or Due), Transaction ID (if available), Linked Order ID and Date & Time of Payment
  • Export Option – Download payment data for reporting, audits, or analysis.

How Payments Work

  1. Order Creation
    • The payments module initiates from the order initiation. Staff add customer items into the POS cart.
    • When the customer is ready for payment, select “Bill & Payment” to move to the payment screen.
  1. Payment Processing
    • Choose the payment method: Cash, Card, UPI, or Due. You can also add tip if needed.
  • The system automatically updates Total Bill, Amount Paid and Due Amount (if any).
  • You can visit Due Payments to complete the payments in future
  1. Split Payments
    • Payments can be split among multiple customers using different ways to split.
    • Each contribution is recorded with its own payment method.
    • The payment can be equally split between the customer members, customer split and it can also split by items.
  1. Due Payments
    • If a customer pays partially, the balance is stored in the Due Section under the customer’s name.
    • Staff can revisit the order later and click “Add Payment” to settle the remaining amount.
    • You can see different status tagged with the orders which will help staff to know if the payments are pending or completed.
  1. Completing the Transaction
    • The pending payments will be listed in Due Payments
    • The complete payments will be listed in Payments section
    • Once the full payment is received, click “Complete Payment.”
    • The invoice can then be generated and printed for the customer.

How Payments can affect Reports in Restro

The Payments Module also integrates with advanced reporting tools to provide valuable insights into sales and revenue.

  • Sales Report
    • Shows daily sales totals within a date range.
    • Displays number of items sold and revenue earned per day.
  • Item Report
    • Provides sales data at the individual item level.
    • Helps track top-selling dishes and underperforming items.
  • Category Report
    • Groups sales data by category (e.g., Starters, Main Course, Drinks, Desserts).
    • Useful for analyzing which category contributes most to revenue.
  • Direct Print Logs
    • In the direct print logs section, you can see the insight of the printer that how many prints have been done and how many failed.
    • This helps in the more attention to failed prints or issues arises during printing invoices.

These reports empower restaurants to make data-driven decisions on menu updates, pricing strategies, promotions, and inventory management ultimately boosting profitability.

With Payment Management in Restro Platform, restaurants gain full control over financial transactions, ensuring smooth billing, accurate records, and valuable business insights.

Check How Orders, KOTs, and Payments invoices can be generated to understand more of the payments in the restro platform.

Muskan Saini
Muskan Saini


Parking Sistem

Managing Delivery Executive Staff

The Delivery Executive Management feature in the Restro Platform helps restaurants efficiently manage and track their delivery workforce. With this module, managers can add, update, and monitor delivery executives, ensuring smooth coordination between kitchen orders and customer deliveries. This not only streamlines operations but also improves delivery speed, customer satisfaction, and accountability.

Why Delivery Executive Management is Important

Managing delivery executives effectively ensures:

  • Faster Deliveries – Orders are assigned quickly to available executives.
  • Improved Customer Experience – Customers receive food on time with live updates.
  • Accountability – Each order is linked to a specific delivery executive, making tracking and performance evaluation easier.
  • Seamless Coordination – Integration with POS and Orders modules ensures that once an order is ready, it can be dispatched smoothly.

Features of Delivery Executive Management

  1. Delivery Executive List
    • View all registered delivery executives in one place.
    • Includes details such as Name, Contact Number, and Status (Active/Inactive).
  2. Add New Executives
    • Easily onboard new delivery staff by adding their details into the system.
    • Assign login access or delivery responsibilities as required.
  3. Update Information
    • Edit or update executive details such as phone numbers, availability status, or assigned zones.
  4. Assign Deliveries
    • Directly link a delivery executive to a customer order from the POS/Orders page.
    • Helps ensure accountability and real-time tracking of the order journey.
  5. Remove Executives
    • Inactive or resigned delivery staff can be removed from the system to keep records clean and updated.
  6. Export Data
    • Just like customer management, delivery data can be exported for reporting, payroll, or performance analysis.

Relation with Other Modules

  • Orders Module – As soon as an order is marked for Delivery, it can be assigned to a delivery executive.
  • POS – Staff can choose Delivery as the order type and link the respective executive.
  • Customer Management – Customers can receive updates about who is delivering their order, improving trust and communication.

You can check how to manage staff for better restaurant operations and have them onboarded. 

Muskan Saini
Muskan Saini


Parking Sistem

Staff Management Module – Streamline Roles, Access, and Operations

The Staff Management module helps restaurants maintain an organized record of employees, streamline daily operations, and ensure accountability. By storing staff details in one place, managers can assign responsibilities, track performance, and keep operations running smoothly.

Overview

Staff Management provides a centralized system where administrators and managers can:

  • Add new staff members.
  • Update or remove staff records.
  • Assign roles and responsibilities.
  • Export data for reporting and HR purposes.

This feature ensures that the right people are assigned to the right tasks, helping restaurants deliver faster service and maintain operational control.

Key Features

1. Search and Filter
  • A search bar makes it easy to find employees by name, email, or phone number.
  • This is especially useful for large teams where quick access to staff records is needed.
2. Staff List
  • The staff table displays all important employee information at a glance
  • This overview allows managers to quickly check who is part of the team and in what capacity.
3. Actions

Each staff record comes with action buttons:

  • Add Member → Managers can add Staff member by Add Member button
  • Update → Modify staff details, such as role, contact information, or employment status.
  • Delete → Remove staff who are no longer part of the restaurant.
4. Role-Based Management
  • Staff members can be assigned specific roles within the system.
  • This ensures proper access control for example, waiters can manage orders, while managers can view reports.
  • Role-based access reduces errors and keeps sensitive data secure.
  • This can be done when the manager creates the staff member login credentials and choose the required role
5. Export Option
  • An Export button is available for downloading staff data.
  • Useful for HR records, payroll processing, or performance analysis.

Why Staff Management Matters

  • Smooth Operations → Clearly defined roles help avoid confusion during busy service hours.
  • Accountability → Each staff action (orders, billing, reservations) is tracked under their profile.
  • Efficiency → Quick access to staff details makes scheduling, communication, and updates easier.
  • Security → Role-based access ensures employees only access the features they need.

Integration with Other Modules

The Staff Management module is closely linked with other parts of the Restro Platform:

  • POS → Staff can be assigned to orders, ensuring accountability for sales.
  • Reservations → Staff managing bookings can be tracked for efficiency.
  • Table Management → Waiters can be assigned to tables for clear responsibility.
  • Customer Management → Staff interactions with customers (orders, requests) are logged for performance tracking.

This integration ensures all staff activities are connected to the broader restaurant workflow, helping managers monitor performance and optimize operations.
With Staff Management, restaurants not only keep their workforce organized but also improve efficiency, security, and accountability all of which are essential for running a successful business.

Muskan Saini
Muskan Saini


Parking Sistem

Managing customers data and their details

The Customer Management module is designed to help restaurants maintain accurate records of their guests and provide more personalized service. By storing customer details such as name, contact information, and order history, staff can quickly access valuable insights that improve both operations and customer experience.

Overview

The Customers Section provides a centralized database of all customers who have placed orders with the restaurant. This makes it easy to:

  • Track order history.
  • Update customer details.
  • Export data for reporting or marketing.
  • Maintain an organized customer list for smoother service and loyalty-building.

Key Features

1. Search and Filter
  • A search bar allows staff to quickly find customers by name, email, or phone number.
  • This makes it easy to retrieve records during repeat visits or when resolving customer queries.
2. Customer List
  • The customer table displays important details at a glance such as name, contact details and addresses. Each customer is linked with their past orders.
  • You can add customer by choosing ADD customer button of the right side and save by filling the details requested.
  • The Total Orders column helps staff identify loyal or frequent customers, making it easier to provide recognition or offer special deals.
  • In case you delete a customer, it provides you an option to proceed with deleting the past orders related to the customers or not.
3. Actions

Each customer entry comes with two action buttons:

  • Update → Edit customer details such as name, phone, or email. Staff can also update order-related information if corrections are needed.
  • Delete → Permanently remove a customer record from the system (useful if duplicate or incorrect data exists).
4. Data Export and Import
  • An Export and Import button is available in the top-right corner.
  • This allows customer data to be downloaded or uploaded in bulk for reporting, analysis, or marketing campaigns.

Why Customer Management Matters

  • Personalized Service → Staff can recognize repeat guests and tailor their service accordingly.
  • Improved Marketing → Exported customer data helps in running targeted promotions and loyalty rewards.
  • Operational Efficiency → Easy search and quick access to customer history reduces delays during service.
  • Better Insights → Knowing which customers order most often or spend the most helps management plan offers and improve retention.

Integration with Other Modules

The Customer Management module works closely with other features of the Restro Platform:

  • POS → Every order placed is linked to the customer’s profile.
  • Reservations → Repeat guests can be quickly identified for priority bookings.
  • Table Management & QR Codes → Orders placed via QR code can still be tracked under the customer’s profile.

With Customer Management, restaurants can go beyond simply serving food. They can build relationships, reward loyalty, and offer personalized experiences that encourage customers to keep coming back.

Check How you can add customers while settling the order in step 4 of Payment while Ordering Guide.

Muskan Saini
Muskan Saini


Parking Sistem

How to Generate KOT, Process Orders, and Complete Payments in POS

The POS streamlines operations with a clear order flow:

Order Taken → KOT Generated (kitchen notified) → Bill Generated (invoice created) → Bill & Payment (transaction recorded) → Bill & Print (receipt issued)

This flow ensures accuracy, speed, and transparency throughout the dining process

Step 1: Take the Order

  • Open the POS page and browse the menu to select items.
  • Use the search bar if needed to quickly find dishes or drinks.
  • Add items to the order cart.
  • Depending on the service type

    Dine-In → Select the table number and enter number of guests (Pax).
    Delivery → Enter customer name, phone, and address.
    Pickup → Record customer name and phone number.
  • At this stage, the order is created but not yet sent to the kitchen.
  • Add discount if needed and proceed with KOT generation

Step 2: Send Order to Kitchen (Generate KOT)

  • After confirming the order, click KOT.
  • A Kitchen Order Ticket is generated and instantly sent to the kitchen dashboard.
  • The order status changes to Running, showing that the kitchen is preparing it.
  • This ensures the kitchen gets the order quickly and accurately.

Step 3: Manage the Order in KOT and Order Tab

  • The KOT and Orders can be managed in the respective Tabs
  • KOT are useful for the Kitchen staff to prepare the order. Kitchen staff can click on start cooking or can cancel the order. Upon confirmation of KOT, It will proceed the Order tab.
  • Orders have phases such as food order received, Food prepared and food served or delivered
  • In order tabs, all the orders will be listed and it shows the status of the order
  • Once the order is prepared, click on the order and move it to served or delivered as per the type of the order
  • Once the order is moved to served, it will automatically change the order status.
  • Now wait for the customer to finish and once the customer completes the food and proceed with bill and payments.

Step 4: Generate the Bill

  • Click on order and choose the bill and print to give a receipt to the customer. 
  • Then click on order to complete the payment and you will see the status of the order is now billed and served. Here additionally you can add customer details. 

Step 5: Process Payment

  • To pay the bill, choose add payment and it will open the payment window.
  • Select the customer’s payment method if cash, UPI, etc
  • Confirm the transaction.
  • The system marks the order as Completed.

Step 6: Print the Receipt

  • In order to  share the receipt to the customer, you can bill and print to s=generate the receipt.

Order Types at a Glance

  • Dine-In → Select table & guest count → Generate KOT → Bill → Payment → Receipt
  • Delivery → Enter customer details & address → Generate KOT → Bill → Payment (online/COD) → Receipt
  • Pickup → Enter customer name & phone → Generate KOT → Bill → Payment at counter → Receipt

Why This Flow Works

  • Fast & Accurate → No miscommunication between staff and kitchen.
  • Flexible → Handles dine-in, delivery, and pickup orders with the same system.
  • Clear Tracking → Every step is logged — orders, KOTs, bills, and payments.
  • Customer Friendly → Smooth service, quick billing, and transparent receipts.

Following this simple Order → KOT → Bill → Payment → Print flow ensures operations stay organized and customers leave happy.

Read about POS Dashboard to understand better the workflow

Muskan Saini
Muskan Saini


Parking Sistem

Understanding POS Dashboard

The POS Module is the heart of the Restro Platform, designed to simplify restaurant operations by bringing together menu browsing, order management, and billing into a single, intuitive interface. It allows staff to take orders quickly, customize them as needed, and generate accurate bills all while ensuring a smooth dining experience for customers.

In the POS, you will see all you added Menus and Menu Items in the center to select and proceed with the KOTs and Orders. Before going forward, add Menus, Menu Items and Menu Categories.

Menu Display Section

At the core of the POS page is the digital menu, presented in a structured and visually clear layout:

  • Categorized Menu: Items are organized into categories (e.g., Starters, Beverages, Main Course, Desserts) for easy navigation. Staff can switch between tabs effortlessly to locate specific items.
  • Search and Filter: A search bar allows instant lookup of items, while a Reset button clears filters and returns to the default menu view.
  • Item Details: Each dish or drink is displayed with its image, name, and price, helping staff quickly identify and select the correct item.
  • It also includes the veg and non veg tags, for drinks it shows the drink tag. All These details you will add while adding the items in the list.

This structured layout improves speed, accuracy, and efficiency in taking orders.

Order Section

On the right-hand side, the order management panel keeps track of all selections and customer details:

  • Order Type: Staff can choose whether the order is for Dine-In, Delivery, or Pickup, ensuring proper routing.
  • Table & Guest Details: For dine-in customers, staff can assign a specific table and record the number of guests (Pax).
  • For Delivery, you can choose the delivery executive to assign for the order. 
  • Active Order View: The order cart shows selected items, quantities, price, and total. An Action column allows real-time edits  such as removing or updating items.
  • You can delete the chosen items by clicking the delete button.
  • You can add a note on every item if there is any special request or allergies information for a few customers. 
  • Using (+) icon, you can add the quantity and with (-) icon reduce the quantity of food item.

This section ensures every order is accurate, customizable, and easy to manage.

Billing and Pricing Section

The billing panel provides complete transparency and accuracy in payment handling:

  • Custom Discounts: Fixed-amount or percentage-based discounts can be applied directly, making it easy to offer promotions or loyalty benefits. The discount can be added as a fixed amount or the percentage of the total amount.

  • Automatic Tax Calculation: Taxes like CGST, SGST, and service charges are auto-applied, ensuring compliance.
  • Order Summary: A detailed breakdown shows subtotal, discounts, taxes, and final payable amount.
  • Action Buttons:
    • KOT (Kitchen Order Ticket): Sends order details to the kitchen.
    • KOT & Print : Print the Kitchen Order Ticket
    • KOT, Bill & Payment : It will generate KOT, print the bill and complete payment. A quick process for pick-ups or instant delivery.
    • Bill: Generates a customer invoice without immediate payment.
    • Bill & Payment: Finalizes billing and records payment in one step.
    • Bill & Print: Creates and prints the bill instantly for customers.

This ensures fast, transparent, and hassle-free billing for both staff and guests.

Why POS Matters

The POS system is more than just an ordering tool — it is a central hub that connects with other modules like Table Management, Reservations, Orders, and QR Code Ordering. By integrating all processes, it ensures:

  • Faster order-taking and reduced errors
  • Clear tracking of dine-in, delivery, and pickup orders
  • Accurate billing with taxes and discounts
  • Better synchronization between the kitchen, waitstaff, and billing desk

Ultimately, the POS system helps restaurants deliver a modern, efficient, and customer-friendly dining experience.

If you need help, check the Menu Guide, Item Guide and Categories Guide

Check How to initiate the Orders, KOTs from POS to proceed with starting orders at your restaurant. 

Muskan Saini
Muskan Saini


Parking Sistem

How customer’s reservations are handled in Restro

If the customer wants to secure a place at the restaurant, the “Reservations” tab can be used to efficiently manage customer bookings, reduce waiting times, and improve the overall dining experience.
With this feature, staff can easily record reservations, assign tables, and keep track of guest details in one place. They can follow up with the customer and change the status as per the customer confirmation.

You can make a reservation from Reservation Tab

This ensures that restaurants can plan seating in advance, optimize table usage, and provide customers with a smoother experience from the moment they arrive.

Why Reservations Are Important

  • Better Planning – Reservations give restaurants the ability to prepare seating layouts and staff assignments in advance.
  • Reduced Wait Times – Guests with confirmed reservations get seated quickly, avoiding long queues.
  • Customer Loyalty – A smooth reservation experience builds trust and encourages repeat visits.
  • Efficient Table Usage – Prevents double-booking and ensures maximum occupancy without overcrowding.
  • Data-Driven Insights – Tracking reservations helps restaurants forecast busy times, special event needs, and recurring customers.

How Reservations Work

  1. From the dashboard, navigate to Reservations to view all upcoming and past bookings.
  2. The system provides a clear overview, including date, time, customer details, and table status.
  3. Use the “Add Reservation” button to record customer details as requested in the form and save the reservation
  1. Staff can update reservation status by following up.
  1. Upon customer’s confirmation, staff can link the reservation to a specific table or allow the system to auto-assign based on availability.
  1. Reservations can be filtered out by using filter options based on date range, contact or customer details.
  1. Reservations can also be canceled directly in the system by choosing the cancelled status, freeing up tables for walk-in customers. It can also be revived if customer changes it’s mind if not any other reservation are made at the same spot.

Reservation Management provides restaurants with an organized and reliable system to handle bookings. By centralizing reservations, assigning tables efficiently, and reducing wait times, restaurants can deliver a more professional and customer-friendly dining experience.

Muskan Saini
Muskan Saini